Every time I see a locked hatch or roped-off passageway on the ship, I am overcome by the desire to see what's behind it. Often it's an empty, completely dark space with nothing (or uninteresting stored "stuff") in it. These compartments are usually not restored, painted, decorated with props, or very comfortable to get in to. All those things make them that much inviting to me because that means they were left reasonably untouched for a looooong time. Due to the aforementioned description of these spaces, most people don't want to see them and they are considered a hazard to the public by the organization that runs the BB-59 these days. However, if you ask nicely, and catch the curator when he's not completely swamped by projects, you can see what's behind these locked hatches. I did just that last winter and had a GREAT TIME. I had three hours to go through spaces that still had check tags in them from 1947 when the ship was laid up in mothballs. I saw so much cool stuff I couldn't possibly post all the pictures I took. I'll limit this post to pictures that most clearly show the spaces they're taken in. It was incredibly dark, which made taking any video a no-go. The only light you see is from the camera flash, as I turned my flashlight away when taking pictures. What you can't tell from the pictures: space was usually very tight, making area shots very difficult, it was REALLY cold that day, and I was constantly impressed by the feeling of entering a time capsule.
I met the curator in the wardroom, where I gave him a list of the spaces I hoped to see. He was very accommodating and we just rattled down the list (to my amazement). He wasn't in a huge hurry, and I was able to spend as much time as I wanted in these places. In other words, I was a kid in a toy store. The first place we went was up, through the main tower of the superstructure. We went up several levels, checking out spaces along the way.
The first few levels of the superstructure are nicely restored, which include the admirals quarters. This is his stateroom main space where he likely conducted business. A large round table is just out of view to the right. That brown hatch toward the back is a direct entrance out onto the 01 level near the #2 16" turret.
The Admiral clearly slept a bit better than the enlisted folks. A funny thing that the curator pointed out was a welded plate over what used to be a porthole offering a great view of a... 5" gun mount. It's right between the two visible structural ribs on the bulkhead. I thought the guys assigned to the 5" gun mount were probably glad to have the porthole covered because it kept the Admiral from watching them relaxing during down time. It's hard to goof off with a flag officer watching over your shoulder!
Most of the 02 level is very well restored.
This is what the ladder well inside the main part of the superstructure above the restored spaces looks like most of the way up. My back is up against the bulkhead here. It's gets tighter as you get toward the top.
About midway up the superstructure, we arrived at the XO's at-sea post called secondary conn. The ship can be steered from here, although it isn't obvious with the helm itself gone. It normally would have been on that horizontal peg attached the equipment facing the porthole to the right in the picture.
Here's the view out the porthole. Sorry; I didn't clean the porthole first. Looks like Sky 1 (5" gun battery radar for the forward sector) would get obstruct the view quite a bit. That's a mooring quay (what you tie up a large ship to) to the right. There are two that the ship is tied up to.
Finally, we arrive at the top of the superstructure, and I mean the top. Spot 1 is the primary visual director for the 16" gun battery. These guys spotted the splash of the rounds and provided corrections for main battery plot down below. Spot 1's job was undercut a bit by the catapult-launched King Fisher float planes carried on the stern. The planes could get up higher than Spot 1 and had a better view of the falling shells. This is one of the stations in Spot 1:
Here's my silly butt parked in the same seat. Notice how stinkin' tight it is in there. Yeah, I know that I forgot to take off my headlight before taking the picture. Hey, it's stinkin' dark in there too. Getting up here required climbing up a couple of very small ladders and squeezing through a couple of narrow hatches.
On the aft bulkhead of Spot 1, there is a hatch leading out to the air defense platform. Getting out into the fresh, frigid air was a shock, but the view was fantastic. For some perspective, look at the highest point on the ship in this picture. That structure capping the "tower" with the horizontal tube laying perpendicular to the length of the ship is Spot 1. The platform just below it is Air Defense.
I won't lie. The view is AWESOME. It would've been better on a sunny day.
After my fingers thawed enough to use them again, we squeezed back through the hatches and slid down the ladders into the O6 level to make our way back below decks. Our next stop was the hold areas in the forward part of the ship. Lots random stuff is stored there now, but it used to been more berthing areas. Below the berthing decks was, and still is, random storage.
I thought I would make this blog the I would want to see it if I hadn't been to any of these places, and I would want to see the "random storage." Here it is. Pretty random.
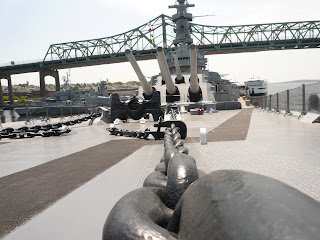
It started getting pretty cool as we went down. The first interesting thing we ran into was the windlass room. This is the machinery that hauls up the chains. The chains are understandably huge. This ship displaced 35,000 tons, so it needs a lot of ass to keep it in place. The cool thing is that these still work! When the BB-59 was towed up to Quincy to be dry docked for some hull work in 1998, the anchors had to come up some how, and this was how.
Down one deck (I think) was the chain locker. This is where the slack from the chains got dumped. The picture does the chains absolutely no justice with respect to size.
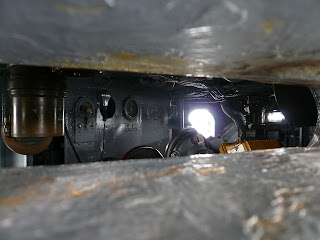
From this level, we started the long climb down into the hold. This was the past and present true compartment for random storage. It was a long way down... This shot is looking through the first and second (the third is still closed) of many hatches down to the bottom. It turned out to be something like 6 decks down!
The funny thing was that the curator found a bunch of things he didn't know were down there! Obviously, there isn't much reason to hang out in the hold, but it was still funny to see him find random useful items. The following are just some interesting items we found, or just cool shots.
Hydraulic line check tag. Notice the date. People haven't been down here in a long while!
I liked all the waaay old original paperwork.
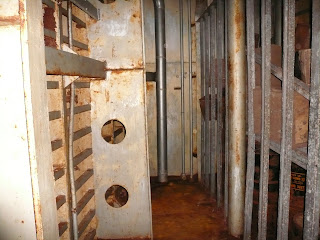
At the very bottom, it felt like we were standing on the keel. There was some items of interest, like buckets of the clay that was used to make bricks for the boilers (they're on the lower right behind the bars). It's the lowest you can go below the waterline. Yeah, I know, not much to see, but it was cool being there and listening to the water lapping on the sides of the ship.
The view from the bottom, before we headed back up. Yup, that was a long climb in the dark.
Next we went into the armored conning tower and bridge areas. The view from there was great too, but this area was clearly all business. Here's the armored fire control above the bridge. Those slits through the steel armor are for, ...well, viewing stuff forward of the ship. This was where folks directed fire if the other fire control stations were smashed. This one was protected by several inches of armor.
To get to the armored fire control station, you had to enter the armored conning tower. Fire control was accessed through a small hatch in the overhead of the conning tower. The hatch to the conning tower was massive. Look at the "door frame" for an idea of how thick the armor is.
Inside the conning tower, you find the ship's wheel (helm).
The flag bridge/pilot house area was under restoration, so tools applenty prevented me from getting a quality shot. A view from the pilot house will have to suffice here.
Here's the flag bridge (Admiral's hang out).
The Admirals combat information center was also under heavy restoration efforts, so I'm omitting pictures of that area. It was pretty torn up then, but it will be great when it's finished.
The captain's areas were all converted to the office spaces used by the association that manages the owns and manages the ship. Not much to see there.
Next we went into radio 3, which looks a whole lot like radio 2. Omitting picture here.
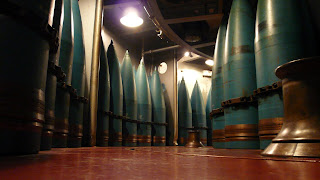
One of my favorite parts was getting into the powder handling area and magazine for the #1 turret. It's nearly a copy of the restored powder handling and magazine for the #2 turret, so the comparison was really cool. Here's a picture of the inside of turret 2's powder handling space. This picture sucks (plexiglass in the way), I know, but just notice that the space is painted, there are cables and tubes appropriately routed and marked, etc.
Here's the same space in the #1 turret. This was awesome because it was almost a dead-pan answer to my interest in the closed off spaces. Not much dramatic here, but it felt like stepping into a time capsule. Markings that sailors made were still on the bulkheads, and nothing had really been touched.
This was interesting too. Some random helmets left behind by the Navy. Typical sailors, leaving gear adrift!
The last two places we went through were one of the engineering spaces (think "engine room") and a shaft alley, which is where one of the screw shaft project aft to where they exit the hull.
The engineering space was not as dark as some of the other spaces, though I can't say why. There was no place for light to enter. There also seemed to be more space in here. Ironically, the business end(s) of the ship are occasionally spacious (magazines, turrets, engine rooms) but the living quarters are pretty cramped.
One thing I will say is that the engine room certainly makes you watch your butt. There plenty of things to trip over, and you'd regret it if you did. That said, it was interesting tooling around down there.
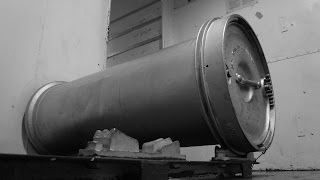
Here's a couple of the boilers. Obviously some of the engine parts got pilfered for other ships while she was in mothballs, but I still wonder how much work it would take to get this thing seaworthy under its own power.
I though this was really funny. The inside of the boilers are lined with bricks! I never would have thought. The curator told me that sailors would occasionally have to make replacement bricks (remember those buckets in the hold) and go inside the boilers to repair a wall. Those walls would remain so hot that cool air would have to be pumped in to make it tolerable to work for short periods of time.
For anyone curious about which engine type was used on the South Dakota class battleships.
Lastly, here is shaft alley. Yes, that is the screw shaft, and yes it goes back a long way. The hatches get smaller and smaller until I decided I didn't want to squeeze through an extra small one. I think I was getting toward the back end of the skegg. I really wanted to see the junction where the shaft makes it through the hull, but no dice folks. The curator said he hated going down there because he inevitebly opens his head on something. He bumped it, but didn't cut himself this time, so I wonder if the curse has been broken?
After we finished in shaft alley, it was time to ship out for the day. The curator was awesome, and he had a lot of interesting things to say about the spaces we visited. If you get the urge to crawl around in dark, dirty spaces I highly recommend this one. I'm going to try to do this again before September, so I'll post those pictures when I do.


