I recently figured out how to make a few adjustments to my camera that allowed me to get some shots of the magazine and shell handling spaces in/around the #2 barbett. The shells got loaded into the gun first, so I'll show that process first. Within each barbett there were annular (circular) spaces that rotated around independently of the turret to move the massive 16" shells to point where the shell handlers could man-handle the shells (called "parbuckling") onto the elevators that would bring the shells up to the gun pits.

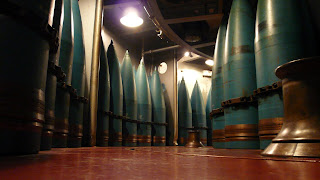
The shells in the 2nd annular space. There are three of these spaces in the #2 barbett rather than than the 2 in the other two turrets. This is because the #2 turret is placed above the #1 turret on the main deck to keep the two turrets out of each others' way. This lift provides space for the third annular space. In this picture, that small bell-shaped object to the right is what the shell handlers used to parbuckle the shells into position in the shell elevators.

Uppermost shell handling space. The only way to see this space is via a small ladder in the 2nd shell handling space. It's poorly lit, and you can only view it through plexiglass at the top of the ladder. It's pretty barren up there, but it's cool to see nonetheless.

This is one of the shell elevators. From here, the shell goes directly up to the gun pit. It arrives to the gun crew vertically, then is tipped over horizontally by the spanner tray that is part of the mechanism receiving the shell. The rammer then pushes the shell into the gun.
The powder follows the shell. Inside the barbett (what the turret assembly fits into) is the powder handling space. The powder bags were loaded onto elevator cars in groups of 6, with 3 bags per level on each of the two levels of the car. Once the powder was loaded, the cars brought it up to the gun pits where the gunhouse crew rolled the bags on the breech spanner tray and rammed them into the gun behind the shell.

This is part of the powder magazine for the #2 turret. The bags lined up on the right are on a roller rack that the powder handlers moved the bags along to get them to where the bags were passed to the powder handlers inside the barbett.

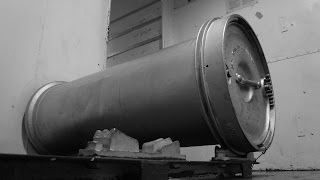
This is a close-up of a powder bag tank. They had to be kept very dry, and away from sparks.

This is the roller track that moves the powder bags to the barbett. Each bag weighs nearly 100lbs.

A flashproof scuttle keeps sparks from moving machinery inside the barbett from reaching the powder magazines. Boom.

Once inside the barbett, the bags got loaded onto powder cars. Look for the white powder bags loaded onto the elevator cars. This was taken from the lowest shell handling space inside the barbett.
Once the shell and powder were loaded and the breech was closed, the gun ready switch was thrown in the gun house, indicating to fire control (far below decks) that the gun was ready to fire. When given the command to fire from the bridge, the gunnery officer fired the gun.

Fire control. This is where the command to fire was received from the bridge.

This is the business end. This is the fire control computer for one of the turrets (notice three triggers, three guns per turret).
End result?

BOOM!
No comments:
Post a Comment